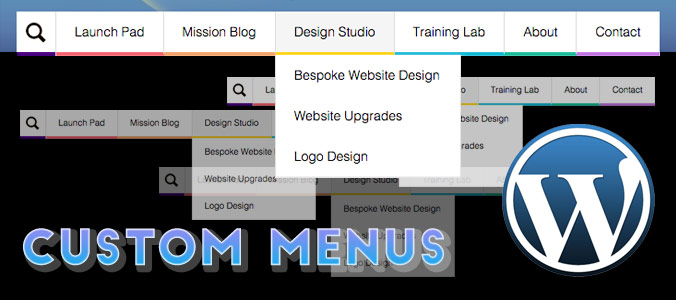
In this post we’ll take you step by step through the process of creating and inserting a custom menu in WordPress. Add a secondary navigation menu into your header area, footer area or directly inside your page content or blog post.
Step 1 – Create a child theme (optional)
Take a look at this blog post >> How to create a child theme in WordPress

Step 2 – Back up your theme’s functions file (really important!)
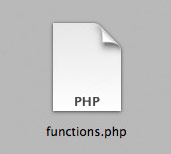
Your functions file lives in your WordPress theme. It’s really useful at adding functionality to your theme – funny that!
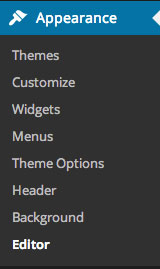
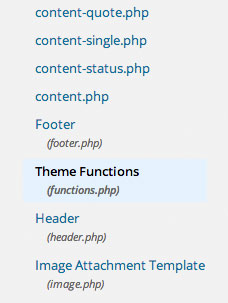
You can view and edit the file by logging into the admin area of your website and navigating to Appearance>Editor and then selecting Theme Functions (functions.php) file.
Next, you need to back it up. This is a very important step, as a small, seemingly insignificant typo can cause your site to stop working! YOU HAVE BEEN WARNED!
To do this you need access to your website’s file structure. This can be achieved by using an FTP client app or through your web host’s control panel (usually referred to as a File Manager section).
![]()
There are many FTP clients available for free online. Try googling ClassicFTP or FileZilla. Once installed you need to create a ‘new connection’ and enter your host server’s log in details. If you don’t know them, log into your host’s control panel and locate or create an FTP account.
Most FTP clients work by displaying two windows side-by-side. In the left-hand window will be your local files (that live on your computer) and the right-hand window will be the remote files that live on your server. Files can usually be uploaded/downloaded with a simple drag and drop procedure.
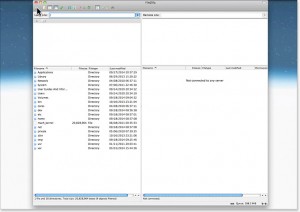
Once logged into your server, navigate to your theme files and download your functions.php file (from your child theme if you have one, or your active theme if you don’t). If anything goes wrong you simply re-upload it onto your site and no harm is done. Keep your FTP connection open and don’t close the window whilst you move throught the next few steps. Your functions file will live in the folder path:
[root-directory]/wp-content/themes/[your-theme]
Sometimes the first directory to navigate into may be www or public-html depending on your server setup.
Step 3 – Registering a new menu
The next step is to add a bit of code into your functions file (the file in your theme – not your backed up version).
To edit your theme’s functions file go to Appearance>Editor within the WordPress admin area and select functions.php
Insert the following code exactly, taking care not to add any additional empty spaces or carriage returns after the last semi-colon character.
function register_my_menu() {
  register_nav_menu('custom-menu',__( 'Custom Menu' ));
}
add_action( 'init', 'register_my_menu' );
Alternatively, if you require more than one additional custom menu you can stack them like so…
function register_my_menus() {
  register_nav_menus(
    array(
      'custom-menu' => __( 'Custom Menu' ),
      'custom-menu-2' => __( 'Custom Menu 2' ),
      'custom-menu-3' => __( 'Custom Menu 3' )
    )
  );
}
add_action( 'init', 'register_my_menus' );
Every line apart from the last within the array ( ) sequence requires a comma. Each line in the array specifies the unique menu identifier and connects it with a common or ‘human readable’ name. The unique identifying name is used henceforth within the website’s code and the common name is displayed and selectable within Appearance>Menus.
Once you’ve pasted in the code, hit update. If you get an error or a blank white page upload your backup file via FTP and try again.
Step 4 – Inserting your new custom menu in WordPress
Next, we insert the following code into the appropriate template file in your theme or child theme.
<?php wp_nav_menu( array( 'theme_location' => 'custom-menu', 'menu_class' => 'my-custom-menu' ) ); ?>
‘custom-menu’ can be replaced with ‘custom-menu-2’ or ‘custom-menu-3’ for example.
If you’d like to place the new menu in your header, locate the file in Appearance>Editor called header.php
If you’d like to place the new menu in your footer, locate the file called footer.php
If you’d like to place it into specific and unique locations within your page content or post content, skip this section and move to step 3 as you need to use a shortcode.
Be careful to locate a good location to paste the code in your template file.
If the template file doesn’t exist in your child them but does in your parent theme, first copy/duplicate the file into your child theme and then modify that. (Keeping the filename the same)
The best places are inbetween different sections and on a new line. For example…
</div>
here
?>
or here
-->
or here
Paste the code in and hit update.
Step 5 – Enabling menu insertion with a shortcode
This step is optional.
If you’d like to insert your new custom menu into specific locations within your page or post content you’ll need to enable insertion via a shortcode.
Paste the following code exactly into your function file.
function my_custom_menu_shortcode( $atts, $content = null) {

    //Attributes
    extract(shortcode_atts(
        array(
            'name' => null,
        ), $atts )
    );

    //Return
    return wp_nav_menu( array( 'menu' => $name, 'echo' => false ) );
}
add_shortcode('menu', 'my_custom_menu_shortcode');
You should now be able to enter menus using this shortcode.
[menu name=”menu-id“]
Replace menu-id with your menu’s unique identifier eg. custom-menu
Add it straight into your page, post or product description and check the results.
Step 6 – Adding menu items

This is a relatively straight forward procedure which you should already be familiar with. Navigate to Appearance>Menus.
Select the correct menu using the dropdown menu (if visible).
Select options from the left-hand panes and click the Add to Menu button.
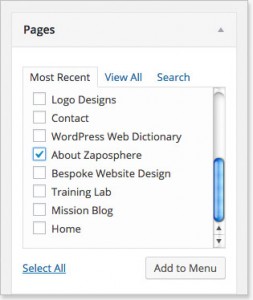
Once inserted menu items can be re-arranged by dragging and dropping. Indented menu items become child (drop down) menu items.
Tick the correct Theme Locations checkbox below and hit Save Menu. If you’ve followed the steps outlined in this post your theme location will be Custom Menu (see Step 1.)
Step 7 – Styling your new menu with CSS
By default your new custom menu will inherit some generic styles from other menus in your theme. However you may want to your custom menu to look differently. Maybe you want it smaller or simpler?
Look at the code for your new menu, it’ll look something like this:
<ul id="…" class="my-custom-menu">
   <li id="…" class="…"><a href="">My First Menu Link</a></li>
   <li id="…" class="…"><a href="">My Second Menu Link</a></li>
      <ul class="sub-menu">
         <li id="…" class="…"><a href="">My Sub Menu Link</a></li>
      </ul>
   <li id="…" class="…"><a href="">My Third Menu Link</a></li>
</ul>
Whilst it would be too much to explain CSS in this blog post, here’s some pointers. To re-style your menu you need to add custom CSS styles either into a your theme settings, the custom CSS feature of JetPack plugin or in your child theme’s style.css file in Appearance>Editor.
How to add custom CSS styles to your new custom menu in WordPress
If you take a look at Step 2 we instructed our menu to includes a menu class of my-custom-menu. This is how we target CSS styles specifically to your new custom menu.
For example, to target the menu as a whole for positioning or global styles try…
ul.my-custom-class { insert styles }
To target menu items try…
ul.my-custom-menu li { insert styles }
To target sub menus…
ul.my-custom-menu ul.sub-menu { insert styles }
To target menu items within sub menus
ul.my-custom-menu ul li { insert styles }
To add some link styling requires more specific styling…
Default link status…
ul.my-custom-menu li a,
ul.my-custom-menu li a:link { insert styles }
Styles upon interaction via a hover, click, touch
ul.my-custom-menu li a:active,
ul.my-custom-menu li a:focus,
ul.my-custom-menu li a:hover { insert styles }
Styles for links known to be previously visited/clicked
ul.my-custom-menu li a:visited { insert styles }
To target one specific menu item separately from any other you’d need a menu ID number.
ul.my-custom-menu li#menu-item-12 { insert styles }
ul.my-custom-menu li#menu-item-12 a,
ul.my-custom-menu li#menu-item-12 a:link { insert styles }
To find a menu item’s ID number, go to the editing page for menus (Appearance>Menus) and hover over the remove or cancel link for that menu item. Then look at the URL the link is going to (shown at the bottom of your window if you’re using Chrome web browser). In the URL will be a string similar to &menu-item= followed by a number. That’s your menu item’s ID. ;D
Summary – How to create a custom menu in WordPress
- Create a child theme (if you haven’t already)
- Backup your child theme’s functions.php file
- Register your new menu/s (paste code in functions file)
- Insert menu into template file (you may need to copy/duplicate files from your parent theme into your child theme)
- Enable shortcode insertion (optional)
- Add menu items (build your menu structure)
- Add CSS styles
I hope you found this article useful. Don’t forget to subscribe, share, shout it from your rooftop terrace and even add a quick comment below. I’d love to hear from you.
Thanks for your support. ^_^